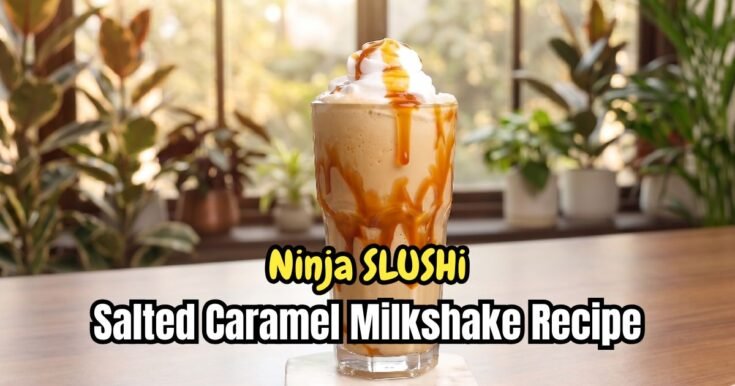
Ninja SLUSHi Salted Caramel Milkshake Recipe

Cold milkshakes at home often turn watery, icy, or too thin in a regular blender. The texture breaks fast, and the caramel flavor becomes weak after a few minutes.
Most frozen caramel milkshakes also lose their creamy feel quickly. Too much ice is often needed in blenders, and that extra ice waters down the strong taste.
The Ninja SLUSHi Salted Caramel Milkshake Recipe solves this problem in a simple way.
The Ninja SLUSHi freezes and mixes at the same time, so the drink stays smooth and thick from start to finish.
The flavor is buttery caramel with a light sea salt balance, inspired by coffee shop desserts. I use this method at home. The making process is simple, beginner-friendly, and very easy to follow.
Why Salted Caramel Works So Well in Frozen Milkshakes
Sweet and salty is one of the strongest flavor pairings in a frozen drink. You get a dessert flavor profile that feels smooth, creamy, and deep at the same time. The caramel texture adds a thick mouthfeel that blends well with frozen milk.
I notice café-style salted caramel drinks often focus on this balance to create a full dessert experience. You also get better flavor layering, where salt lifts the sweetness instead of hiding it.
It helps reduce icy taste, improves creaminess, supports dairy fullness, and keeps the drink bold from first sip to last sip.
Ninja SLUSHi Salted Caramel Milkshake Ingredients
- Whole Milk – 1 cup: Whole milk gives the milkshake a smooth and creamy base. It blends well with the ice cream and caramel sauce for a rich frozen texture. 2% milk can work for a lighter drink. Oat milk or almond milk also work well for a dairy-free version.
- Vanilla Extract – 1 teaspoon: Vanilla extract adds a soft sweet flavor that blends nicely with the caramel. Pure vanilla extract gives the best flavor. Vanilla bean paste can replace it and adds small vanilla bean specks to the milkshake.
- Sea Salt – ¼ teaspoon: Sea salt helps balance the sweet caramel flavor. It gives the milkshake that classic sweet-and-salty taste. Kosher salt can replace sea salt, but a slightly smaller amount works better.
- Double Cream – ½ cup: Double cream creates a thick and rich frozen texture. It also helps the milkshake stay creamy longer inside the Ninja SLUSHi machine. Heavy whipping cream is a good substitute and gives a similar result.
- Vanilla Ice Cream – 2 cups: Vanilla ice cream gives the milkshake its creamy body and classic flavor. It also helps create the thick frozen consistency. Caramel ice cream can replace vanilla for deeper caramel flavor. Frozen vanilla yogurt works for a lighter option.
- Caramel Sauce – 3 tablespoons, plus extra for drizzle: Caramel sauce gives the milkshake its buttery caramel flavor and smooth sweetness. Thick caramel sauce works best for a creamy texture. Salted caramel sauce adds extra flavor depth. Butterscotch sauce can also work as a substitute.
Kitchen Tools You’ll Need
- Ninja SLUSHi machine – Freezing and mixing base
- Measuring cups – Accurate ingredient amounts
- Measuring spoons – Small ingredient control
- Mixing bowl – Pre-blending ingredients
- Spatula – Scraping thick mixture
- Serving glasses – Final drink presentation
- Caramel drizzle bottle – Glass lining effect
How to Make Ninja SLUSHi Salted Caramel Milkshake
Step 1 | Make the Milkshake Mixture
Pour 1 cup of whole milk into a mixing bowl. Then add ½ cup of double cream, 1 teaspoon of vanilla extract, and ¼ teaspoon of sea salt.
Next, scoop in 2 cups of vanilla ice cream. Finish with 3 tablespoons of caramel sauce. Mix everything very well.
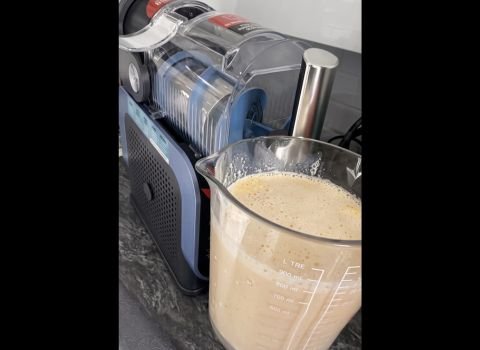
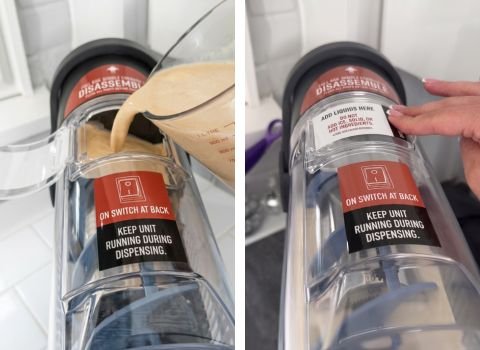
Step 2 | Pour the Mixture & Secure the Lid
Pour the mixture into the Ninja SLUSHi machine. Then place the lid firmly on the Ninja SLUSHi and press it down until it clicks.
This step is important because a loose lid can affect proper mixing and freezing. Always check that the lid is locked before starting the machine.
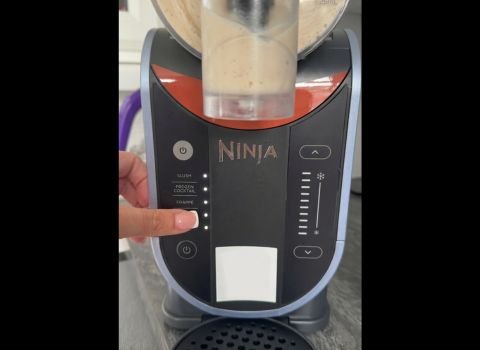
Step 3 | Select the Milkshake Setting
Press the milkshake setting on the machine. It will begin mixing and freezing at the same time. Let the full cycle run without opening the lid. Wait for the beep that signals the milkshake is ready.
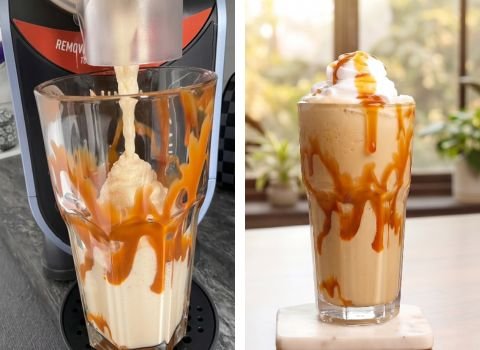
Step 4 | Prepare Your Glass
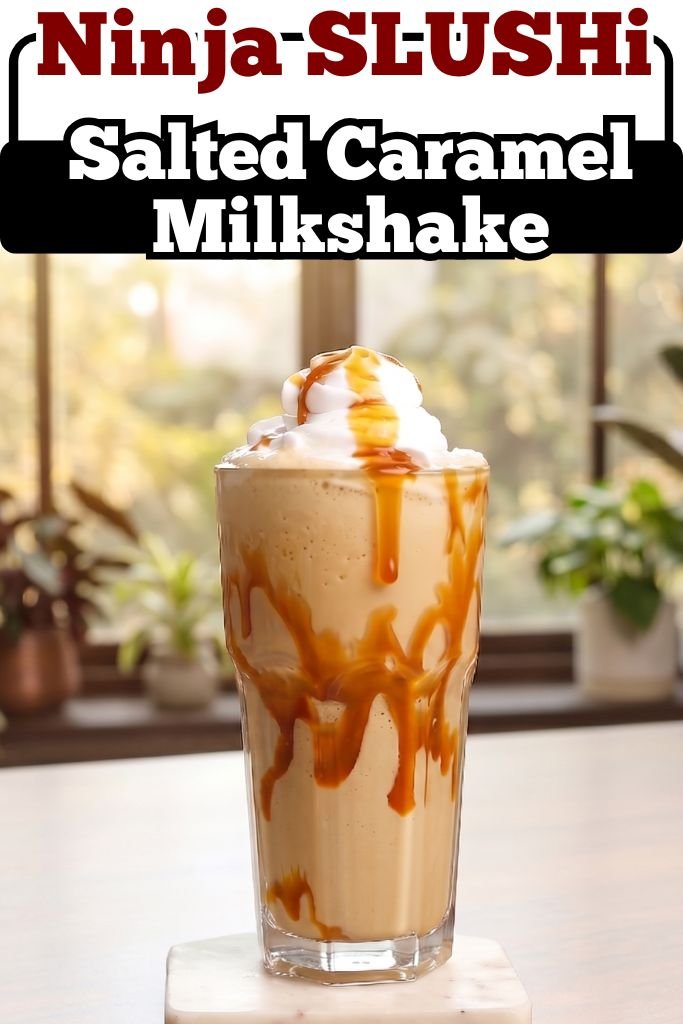
While the machine runs, drizzle caramel sauce inside a tall glass. Tilt the glass while swirling to create a spiral coating. This adds extra caramel flavor and gives it a café-style look.
Step 5 | Pour and Serve
Once the machine beeps, pour the thick milkshake into the prepared glass. Finish with a light caramel drizzle on top. Serve immediately while the texture is cold, creamy, and thick.
Chef’s Pro Tips
- Chill the serving glass – Place the glass in the freezer for 5 minutes before serving. This helps the milkshake stay cold and thick longer.
- Do not overfill the machine – Keep the mixture below the max fill line. Too much liquid can affect the freezing and mixing process.
- Slightly soften the ice cream – Let the ice cream sit for 2 minutes before adding it. Softer ice cream blends more smoothly in the machine.
- Add extra sea salt before serving – A tiny pinch of sea salt on top adds stronger salted caramel flavor and balances the sweetness better.
- Freeze the cream for thicker texture – Use very cold double cream for a thicker frozen texture. This creates an even thicker frozen milkshake consistency.
Serving Suggestions for Salted Caramel Milkshakes
Salted caramel milkshakes can be served in simple or more tasty ways, depending on the mood.
A thick layer of whipped cream on top adds a soft and creamy finish. A thick caramel drizzle right before serving gives extra sweetness and a glossy look.
A salty crunch also works very well with this drink. Crushed pretzels or shortbread cookies on top add texture and balance the smooth shake. This makes every sip more interesting and layered.
The milkshake also pairs well with warm desserts. Brownies or a slice of pie on the side turn it into a full dessert plate experience. The cold shake and warm dessert create a nice contrast.
For a simple setup, a shake bar idea works well. Toppings like toffee bits, sea salt flakes, and cookie crumbles let each glass be customized in a simple and creative way.
Ninja SLUSHi Salted Caramel Milkshake Recipe FAQs
Can this recipe work without the Ninja SLUSHi machine?
Yes, but the texture may feel different. A regular blender can mix the ingredients well, though the milkshake may melt faster and become thinner quickly.
Many blender drinks also need extra ice for thickness, and that can weaken the caramel flavor. The Ninja SLUSHi machine creates smoother frozen texture because it freezes while mixing at the same time.
Do I need to add ice cubes?
No. Never add ice to the Ninja SLUSHi. The machine freezes the liquid itself. Ice would make the shake watery and could damage the machine. The built-in freezing system does all the work.
What is the best glass for serving?
A tall 16-ounce milkshake glass or a mason jar works great. The narrow shape keeps the shake colder longer. Wide cups make it melt faster. Chill the glass in the freezer for 10 minutes before serving.
How long does the shake stay thick?
The milkshake stays thick for about 10 to 15 minutes after serving in a chilled glass. After that, the texture slowly becomes softer.
The Ninja SLUSHi machine keeps the shake frozen and creamy much longer than a regular blender while the machine stays on, up to 12 hours.
For the best thick and smooth texture, serve the milkshake right after dispensing.
Why does my shake taste too salty?
You might have used table salt instead of sea salt. Table salt is much stronger. Use only ⅛ teaspoon if that is all you have. Or skip the salt in the mix and only add a tiny pinch on top.
Can I prepare the mixture early?
Yes, the liquid mixture can stay covered in the refrigerator for several hours before freezing. Stir the mixture again before pouring it into the Ninja SLUSHi machine because caramel sauce may settle at the bottom.
Keeping the ingredients cold before freezing also helps improve the final frozen texture. Freshly frozen milkshakes usually taste smoothest right after preparation.
Ninja SLUSHi Salted Caramel Milkshake Recipe
Ninja SLUSHi Salted Caramel Milkshake Recipe made in just 30 minutes with creamy caramel flavor, thick frozen texture, and café-style results.
Ingredients
- 1 cup whole milk
- ½ cup double cream
- 1 teaspoon vanilla extract
- ¼ teaspoon sea salt
- 2 cups vanilla ice cream
- 3 tablespoons caramel sauce
- Extra caramel sauce for drizzle
Instructions
- Pour 1 cup of whole milk into a mixing bowl. Then add ½ cup of double cream, 1 teaspoon of vanilla extract, and ¼ teaspoon of sea salt. Next, scoop in 2 cups of vanilla ice cream. Finish with 3 tablespoons of caramel sauce. Mix everything very well.
- Pour the mixture into the Ninja SLUSHi machine. Then place the lid firmly on the Ninja SLUSHi and press it down until it clicks. This step is important because a loose lid can affect proper mixing and freezing. Always check that the lid is locked before starting the machine.
- Press the milkshake setting on the machine. It will begin mixing and freezing at the same time. Let the full cycle run without opening the lid. Wait for the beep that signals the milkshake is ready.
- While the machine runs, drizzle caramel sauce inside a tall glass. Tilt the glass while swirling to create a spiral coating. This adds extra caramel flavor and gives it a café-style look.
- Once the machine beeps, pour the thick milkshake into the prepared glass. Finish with a light caramel drizzle on top. Serve immediately while the texture is cold, creamy, and thick.
Nutrition Information
Serving Size 1Amount Per ServingCalories 640Total Fat 42gSaturated Fat 26gCholesterol 145mgSodium 340mgCarbohydrates 58gFiber 1gSugar 50gProtein 9g
This Ninja SLUSHi Salted Caramel Milkshake Recipe creates smooth café-style frozen drinks with very little effort. The creamy texture, buttery caramel flavor, and light sea salt balance taste smooth and satisfying in every sip.
Serve it with brownies, cookies, or extra toppings for many easy custom dessert ideas at home.